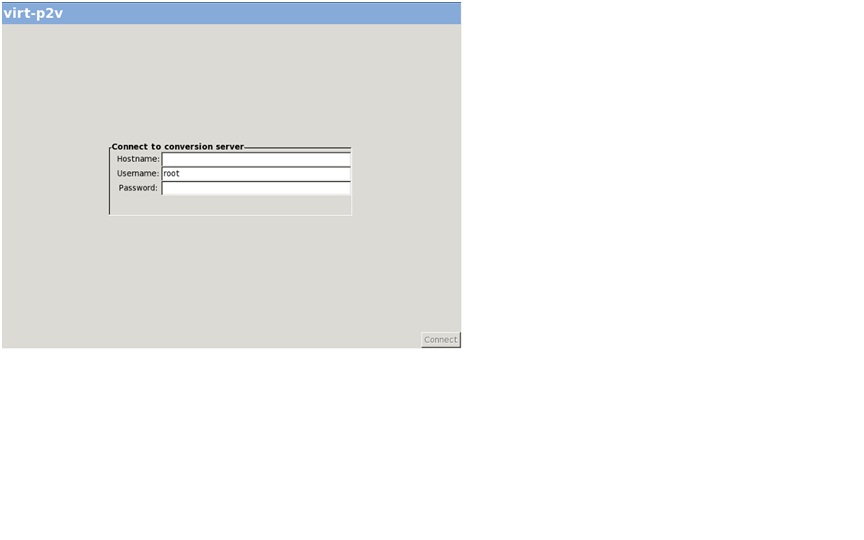
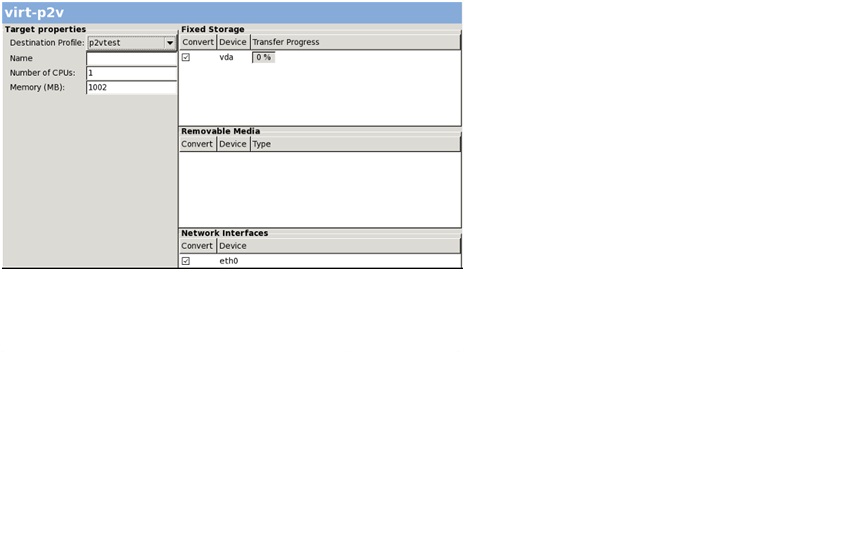
为什么要把一台实体机转换成KVM虚拟机?我们公司的一些商业的应用软件(如turboCMS)过保了。虽然还在使用这些软件应用,但运行这些软件应用的服务器硬件已经很老了,是6年前的机器,会经常出现当机的情况。如果要升级硬件,也需要同时让商业软件提供商来重新安装这些软件。而一般来说,这些软件提供商只提供升级服务,这就意味着一笔很高的软件升级及安装服务费用。而P2V正好可以解决这个问题。
1、P2V 的概念
将物理机整个系统迁移到虚拟机称之为P2V迁移,即Phisycal to Virtual migration。这种迁移方式,主要是使用各种工具软件(如KVM中使用virt-p2v工具),把物理服务器上的系统状态和数据“镜像”到 KVM 提供的虚拟机中,并且在虚拟机中“替换”物理服务器的存储硬件与网卡驱动程序。只要在虚拟服务器中安装好相应的驱动程序并且设置与原来服务器相同的地址(如 TCP/IP 地址等),在重启虚拟机服务器后,虚拟服务器即可以替代物理服务器进行工作。
2、P2V的实现方式
###在KVM服务器上安装P2V相关的软件。因为是要转换一台windows2003系统的实体机,所以要安装libguestfs-winsupport(NTFS支持)及virtio-win-1.5.2-1.el6两个软件包。virtio-win-1.5.2-1.el6包用yum无法直接安装,可以到网上下一个:http://longgeek.com/download/virt-v2v/ MD5:be027169aa624b92386b4d0eeef69391
[root@kvm01 ~]#yum -y install qemu-kvm libvirt python-virtinst virt-manager fontforge xorg-x11-twm xterm tigervnc-server
[root@kvm01 ~]#yum install –y virt-p2v virt-v2v libguestfs-winsupport
[root@kvm01 ~]#rpm –ivh virtio-win-1.5.2-1.el6.noarch.rpm
###在KVM服务器上把ssh 登录方式设置成root可用密码登录的方式:
[root@kvm01 ~]# cat /etc/ssh/sshd_config | grep -i PASS
PasswordAuthentication yes
[root@kvm01 ~]# cat /etc/ssh/sshd_config | grep -i root
PermitRootLogin yes
###生成/etc/virt-v2v.conf文件:
[root@kvm01 ~]# cat /etc/virt-v2v.conf
< virt-v2v>
     < profile name=”libvirt”>
       < method>libvirt
       < storage>default
       < network type=”default”>
          < network type=”network” name=”default”/>
       < /network>
    < /profile>
< /virt-v2v>
###把/usr/share/virt-p2v/virt-p2v-0.8.6-5.20120502.1.el6.iso文件刻录成光盘
[root@kvm01 ~]dd if=/usr/share/virt-p2v/virt-p2v-0.8.6-5.20120502.1.el6.iso of=/dev/cdrom
###把实体机设置成光盘启动,用上面记录的光盘引导启动实体机,并配置网络,要求和KVM服务器在同一个网段内,如果手动配置网络的话,ip/mask/网关/DNS都配置上,不会然报错。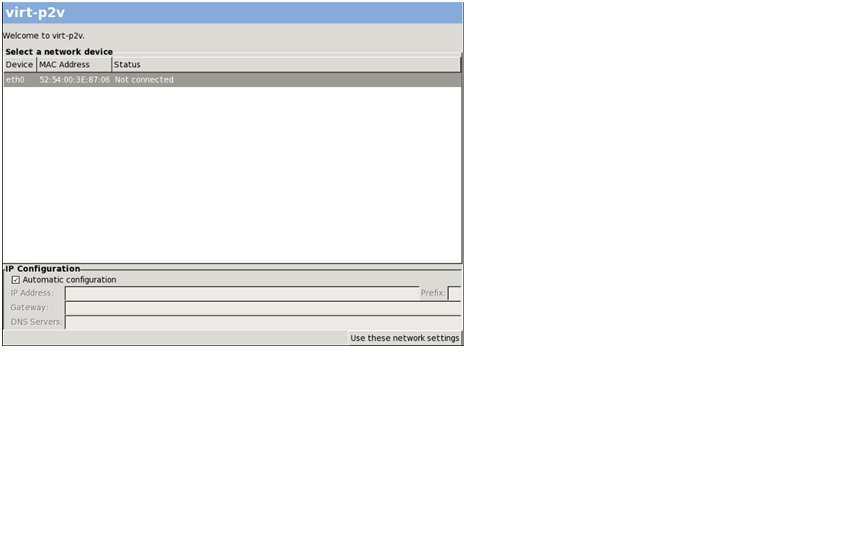
3、完成转换后的注意事项
A、查看是否生成了相关虚拟机配置?
[root@kvm01 ~]# cat /etc/libvirt/qemu/cms.xml | sed s/\</\<\ /g
< !–
WARNING: THIS IS AN AUTO-GENERATED FILE. CHANGES TO IT ARE LIKELY TO BE
OVERWRITTEN AND LOST. Changes to this xml configuration should be made using:
  virsh edit cms
or other application using the libvirt API.
–>
< domain type=’kvm’>
< name>cms< /name>
< uuid>0a27c932-e747-2826-02c7-634a58309a7b< /uuid>
< memory unit=’KiB’>4194304< /memory>
< currentMemory unit=’KiB’>4194304< /currentMemory>
< vcpu placement=’static’>4< /vcpu>
< cputune>
< vcpupin vcpu=’0’ cpuset=’0’/>
< vcpupin vcpu=’1’ cpuset=’1’/>
< vcpupin vcpu=’2’ cpuset=’2’/>
< vcpupin vcpu=’3’ cpuset=’3’/>
< /cputune>
< os>
< type arch=’i686’ machine=’rhel6.3.0’>hvm< /type>
< boot dev=’hd’/>
< /os>
< features>
< acpi/>
< apic/>
< pae/>
< /features>
< cpu mode=’custom’ match=’exact’>
< model fallback=’allow’>Nehalem< /model>
< vendor>Intel< /vendor>
< feature policy=’require’ name=’tm2’/>
< feature policy=’require’ name=’est’/>
< feature policy=’require’ name=’monitor’/>
< feature policy=’require’ name=’ds’/>
< feature policy=’require’ name=’ss’/>
< feature policy=’require’ name=’vme’/>
< feature policy=’require’ name=’dtes64’/>
< feature policy=’require’ name=’rdtscp’/>
< feature policy=’require’ name=’ht’/>
< feature policy=’require’ name=’dca’/>
< feature policy=’require’ name=’pbe’/>
< feature policy=’require’ name=’tm’/>
< feature policy=’require’ name=’pdcm’/>
< feature policy=’require’ name=’vmx’/>
< feature policy=’require’ name=’ds_cpl’/>
< feature policy=’require’ name=’xtpr’/>
< feature policy=’require’ name=’acpi’/>
< /cpu>
< clock offset=’utc’/>
< on_poweroff>destroy< /on_poweroff>
< on_reboot>restart< /on_reboot>
< on_crash>restart< /on_crash>
< devices>
< emulator>/usr/libexec/qemu-kvm< /emulator>
< disk type=’file’ device=’disk’>
< driver name=’qemu’ type=’raw’ cache=’none’/>
< source file=’/opt/images/cms-sda’/>
< target dev=’vda’ bus=’virtio’/>
< address type=’pci’ domain=’0x0000’ bus=’0x00’ slot=’0x05’ function=’0x0’/>
< /disk>
< disk type=’file’ device=’cdrom’>
< driver name=’qemu’ type=’raw’/>
< target dev=’hda’ bus=’ide’/>
< readonly/>
< address type=’drive’ controller=’0’ bus=’0’ target=’0’ unit=’0’/>
< /disk>
< controller type=’usb’ index=’0’>
< address type=’pci’ domain=’0x0000’ bus=’0x00’ slot=’0x01’ function=’0x2’/>
< /controller>
< controller type=’ide’ index=’0’>
< address type=’pci’ domain=’0x0000’ bus=’0x00’ slot=’0x01’ function=’0x1’/>
< /controller>
< interface type=’bridge’>
< mac address=’00:01:02:03:02:08’/>
< source bridge=’br0’/>
< model type=’virtio’/>
< address type=’pci’ domain=’0x0000’ bus=’0x00’ slot=’0x03’ function=’0x0’/>
< /interface>
< interface type=’bridge’>
< mac address=’00:01:02:03:02:0a’/>
< source bridge=’br1’/>
< model type=’virtio’/>
< address type=’pci’ domain=’0x0000’ bus=’0x00’ slot=’0x04’ function=’0x0’/>
< /interface>
< serial type=’pty’>
< target port=’0’/>
< /serial>
< console type=’pty’>
< target type=’serial’ port=’0’/>
< /console>
< input type=’tablet’ bus=’usb’/>
< input type=’mouse’ bus=’ps2’/>
< graphics type=’vnc’ port=’-1’ autoport=’yes’/>
< video>
< model type=’cirrus’ vram=’9216’ heads=’1’/>
< address type=’pci’ domain=’0x0000’ bus=’0x00’ slot=’0x02’ function=’0x0’/>
< /video>
< hostdev mode=’subsystem’ type=’usb’ managed=’no’>
< source>
< vendor id=’0x08e2’/>
< product id=’0x0002’/>
< /source>
< /hostdev>
< memballoon model=’virtio’>
< address type=’pci’ domain=’0x0000’ bus=’0x00’ slot=’0x06’ function=’0x0’/>
< /memballoon>
< /devices>
< /domain>
B、可以用virtsh edit cms 命令来更改相关自动生成的虚拟机的配置。如磁盘、网络等的配置。当然也可以使用virt-manager来进行更改。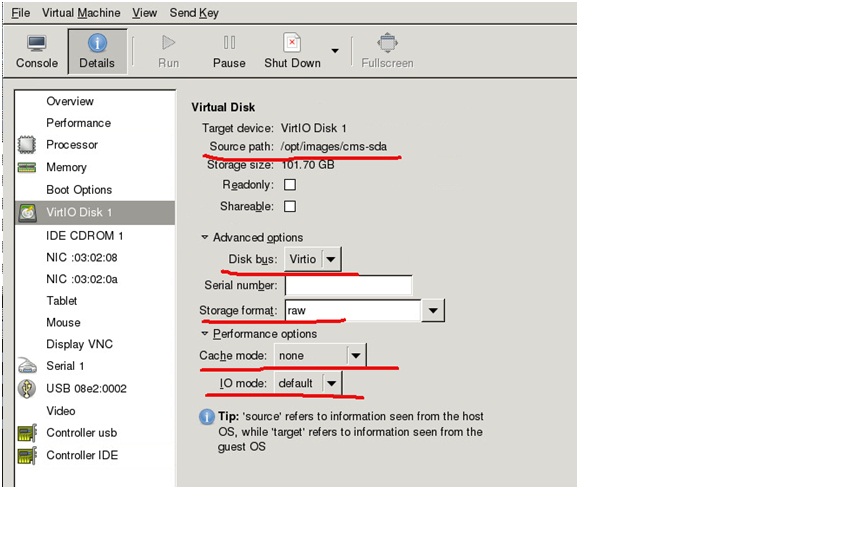
C、如果老的机器使用的CPU非常老,建议在virt-manager中点击Copy host CPU config进行再配置。不然可能会出现你配置了4个CPU,在系统中只能看到1个CPU的情况。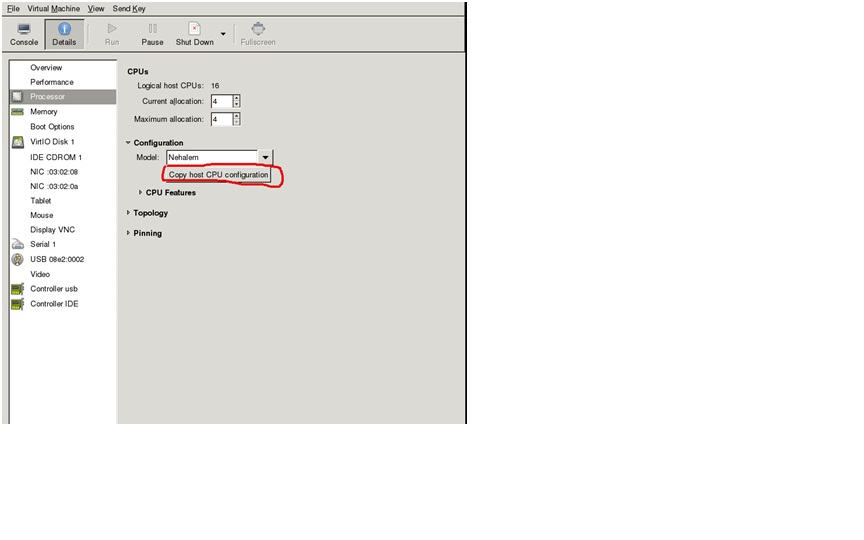
D、注意在启动虚拟机后,查看转换后的windows 2003虚拟机的磁盘及网卡的驱动是否使用了virtio,不使用virtio这个半虚拟化驱动,对性能的影响会很大。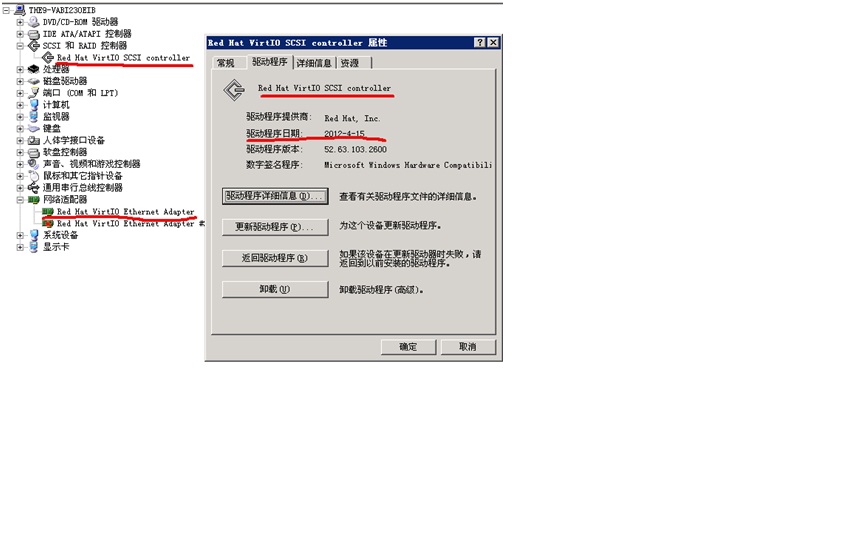
4、通过KVM的usb passthrough 功能把KVM实体机上TurboCMS软件狗map到虚拟机上。
TurboCMS有一个usb软件狗,我们必须把KVM实体机上的USB软件狗passthrough到VM上,可以用下面的方式来实现。
[root@kvm01 script]# lsusb    #查看新加的USB设置的ID,粗体标出。
Bus 001 Device 001: ID 1d6b:0002 Linux Foundation 2.0 root hub
Bus 002 Device 001: ID 1d6b:0001 Linux Foundation 1.1 root hub
Bus 003 Device 001: ID 1d6b:0001 Linux Foundation 1.1 root hub
Bus 004 Device 001: ID 1d6b:0001 Linux Foundation 1.1 root hub
Bus 005 Device 001: ID 1d6b:0001 Linux Foundation 1.1 root hub
Bus 006 Device 001: ID 1d6b:0001 Linux Foundation 1.1 root hub
Bus 006 Device 002: ID 03f0:1027 Hewlett-Packard Virtual keyboard and mouse
Bus 005 Device 007: ID 08e2:0002
You have new mail in /var/spool/mail/root
[root@kvm01 script]# virsh edit cms    #增加下面的内容并关闭启动虚拟机:
    < hostdev mode=’subsystem’ type=’usb’ managed=’no’>
      < source>
        < vendor id=’0x08e2’/>
        < product id=’0x0002’/>
      < /source>
< /hostdev>
**另外注意一下虚拟机的时间,我就是因为虚拟机时间变成了一个2015年的时间,造成usb 狗无法使用。提示是“没有插入USB狗,我刚开始还以为是usb passthrough的问题”.后来才知道,是因为usb狗里会记录你当前使用时的系统时间,如果你使用了一个未来的时间,当你再次调整回当前时间时,usb狗会无法使用。后来还是通过关系,才向厂商要到了一个工具,把usb狗里的时间回复成原来的。
5、相关参考链接:
官方链接:
https://access.redhat.com/site/documentation/en-US/Red_Hat_Enterprise_Linux/6/html-single/V2V_Guide/index.html#chap-V2V_Guide-P2V_Migration_Converting_Physical_Machines_to_Virtual_Machines
一个介绍先通过VMWARE工具把实体机先转换成VMWARE虚拟机,然后再转换成KVM虚拟机的方案,好处是可以把一台在线运行的实体机在不关机的情况下转换成KVM虚拟机。VMWARE的确在虚拟化方面要比RedHat强一点。:
http://longgeek.com/2012/12/28/online-p2v-migration-windows-linux-kvm/
在没有virt-P2V工具前的操作方法,看看史前是怎么操作的,其实方法是一至的,只是现在更智能一点了:**
http://openwares.net/linux/kvm_p2v.html
